Guided Questionnaire widgets help customers find the right products by presenting a series of questions that narrow down products within a category. These widgets are best for higher funnel pages like Product Listing Pages (PLPs) or the homepage where customers may need help discovering the right product among many options.
When a customer clicks on a response option, the alby Chat launches with both the question and answer already inserted into the conversation thread. Your alby agent then responds based on this context.
There are two types of Guided Questionnaire widgets:
Custom
You prescribe the exact question and possible answers for each widget, also setting follow-up questions, like a flowchart.
Dynamic.
Pulls from your catalog and products to use pregenerated questions and answers depending on the category.
Custom Guided Questionnaire
A Custom Guided Questionnaire widget allows you to write the questions and possible responses within the alby dashboard.
You can configure follow-ups on a per-question basis, so your alby agent can ask additional questions only when specific answers are chosen.
Before creating the widget, create the custom survey your customers will complete. When creating the survey, you can zoom in or out and drag questions around.
It is recommended to limit the custom surveys to three customer-facing questions in the flow, but you can have as many questions as needed in the experience to accommodate all of the potential flows.
How to create a custom survey
Navigate to Knowledge > Survey Questions in the alby dashboard, then click the Custom tab > Add Custom Survey.
Click the pencil icon to name the survey.
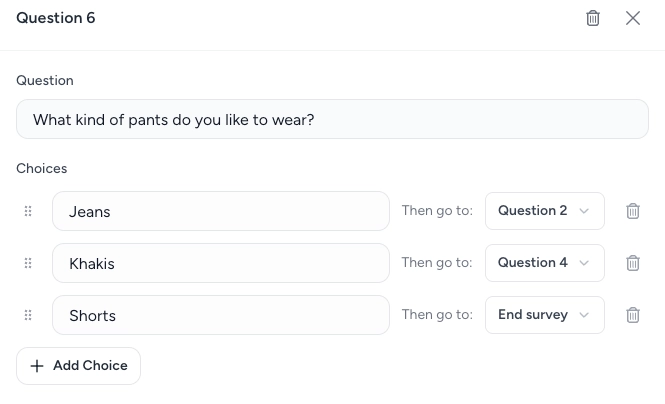
In the custom survey canvas, click + Add Question to open the question menu. From there, you can type your question, any possible answers, and direct customers to the next step based on how they respond, by choosing a question or ending the survey in the dropdown next to Then go to:.
When you’re done with that question, click Save Changes to return to the canvas, then repeat step 3 for as many questions as you want to add.

Be careful not to create infinite loops, meaning answers to questions that lead back to the same question. For example, if an answer to question 1 leads a customer to question 2, don’t make anything from question 2 lead back to question 1.
Once you’ve saved your questions and finished a survey for customers, make sure the flow makes sense.
How to create a Custom Guided Questionnaire widget
Navigate to Experiences in the alby dashboard. Click New Widget > Guided Questionnaire.
Name your Guided Questionnaire widget and select Custom.
Select the survey you made in the previous section, or a different already built one.
Test your widget.
Click the gear icon, then set the context for the preview page with a category, and at least one product.
Customize your widget.
See Customize alby's look and feel for more information on customization options.
Once configured, save your widget, click Embed, and add it to your desired page.
Dynamic Guided Questionnaire
Dynamic Guided Questionnaire widgets automatically generate relevant questions based on product categories.
Questions are selected from the bank of AI-generated survey questions for that category, but you can change the questions as needed. See Managing Guided Questionnaire's questions to optimize the customer experience for more information.
How to create a Dynamic Guided Questionnaire
Navigate to Experiences in the alby dashboard.
Click New Widget > Guided Questionnaire.
Name your Guided Questionnaire Widget.
Click the gear icon, then set the context for the preview page with a category, and at least one product.
Select Dynamic.
Test your widget in the preview area of the page, responding to questions as a customer would.
Customize your widget.
See Customize alby's look and feel for more information on all the customization options.
Once configured, save your widget, click Embed, and add it to your desired page.